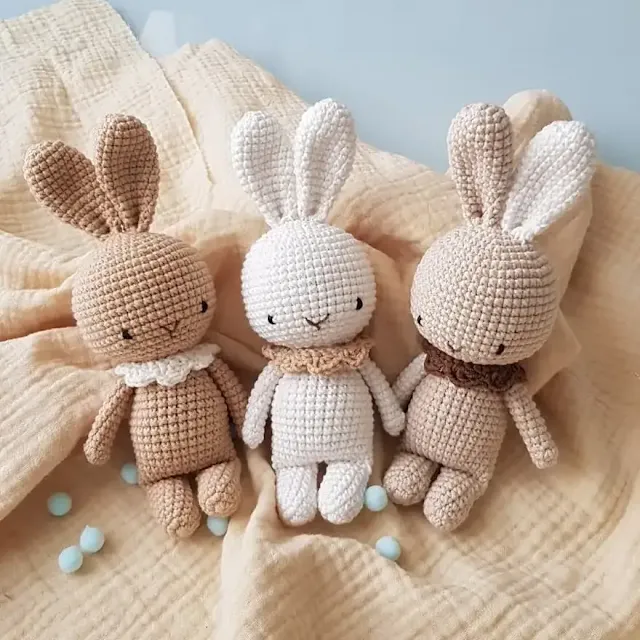
Create an adorable handmade amigurumi bunny wearing a stylish crochet collar with this free pattern! Perfect for beginners, this sweet bunny is crocheted with the body and legs as a single piece, making it easier to assemble. When finished, your new fluffy friend will stand approximately 18 cm (7") tall.
Materials You'll Need
- Yarn: YarnArt Jeans (55% cotton, 45% acrylic, 50 g/160 m)
- Main color for bunny
- Additional color for collar
- Hook size: 2.0 mm
- Embroidery thread: Black and brown for eyes and nose
- Tools:
- Tapestry needle
- Scissors
- Stitch marker
- Fiberfill
Crochet Abbreviations Guide
- R = row
- mc = magic circle
- ch = chain
- st = stitch
- sl st = slip stitch
- sc = single crochet
- dc = double crochet
- inc = 2 sc in the next stitch
- dec = single crochet 2 stitches together
- F.o. = finish off
- (...) = number of stitches you should have at the end of the round/row
- (...) *6 = repeat whatever is between the brackets the number of times stated
Pattern Instructions
Arms (make 2)
R 1: 8 sc in mc (8) R 2-12: 8 sc (11 rows) Fold top of the arm flat and 4 sc through both sides across.
Ears (make 2)
R 1: 6 sc in mc (6)
R 2: (inc) * 6 (12)
R 3: (1 sc, inc) * 6 (18)
R 4-11: 18 sc (8 rows)
R 12: (1 sc, dec) * 6 (12)
R 13-16: 12 sc (4 rows) Fold top of the ear flat and 6 sc through both sides across. F.o. and leave a long tail for sewing.
Head
R 1: 6 sc in mc (6)
R 2: (inc) * 6 (12)
R 3: (1 sc, inc) * 6 (18)
R 4: (2 sc, inc) * 6 (24)
R 5: (3 sc, inc) * 6 (30)
R 6: (4 sc, inc) * 6 (36)
R 7: (5 sc, inc) * 6 (42)
R 8: (6 sc, inc) * 6 (48)
R 9-18: 48 sc (10 rows)
R 19: (6 sc, dec) * 6 (42) R 20: (5 sc, dec) * 6 (36) R 21: (4 sc, dec) * 6 (30) Stuff with fiberfill. R 22: (1 sc, dec) * 10 (20) R 23: make dec on the sides of body (18) Finish stuffing. F.o. Embroider eyes in R 7 and nose.
Legs and Body (one piece)
Legs (make 2)
R 1: 6 sc in mc (6)
R 2: (inc) * 6 (12)
R 3-9: 12 sc (7 rows) Stuff a little with fiberfill. Fold top of the leg flat and 6 sc through both sides across. F.o. Don't cut the yarn when you'll finish the second leg!
Make 3 ch on the second leg, continue crocheting the body in the round:
Body
R 1: 12 sc on the first leg (6 sc in FLO and 6 sc in BLO), 3 sc in 3 ch, 12 sc on the second leg (6 sc in FLO and 6 sc in BLO), 3 sc in 3 ch (opposite side) (30)
R 2-10: 30 sc (9 rows)
R 11: make dec on the sides of body (28)
R 12: make dec on the sides of body (26)
R 13: make dec on the sides of body (24)
R 14: make dec on the sides of body (22)
R 15: make dec on the sides of body (20)
R 16: attach the arms with single crochet (20)
R 17: make dec on the sides of body (18) Stuff with fiberfill. F.o. and leave a long tail for sewing. Sew the head to the body, the ears on the head.
Crochet Collar
With additional color: Make 24 ch. Work on both sides of the chain.
R 1: from the second chain from hook: 23 sc.
R 2: on the opposite side of the chain: (dc, 2 ch, dc in the next st, 2 ch, dc in the next st), skip 1 sc, sl st. Repeat to the end of the row. F.o. and sew the collar on the neck.
Finishing Your Amigurumi Bunny
Once you've completed all the pieces, carefully attach the head to the body using the long tail you left for sewing. Position the ears on top of the head and secure them firmly. Finally, add the decorative collar around the bunny's neck for that perfect finishing touch.
Your sweet amigurumi bunny is now ready to be displayed or gifted! This adorable handmade toy makes a wonderful present for children or a charming decoration for your home.
Share Your Creation!
Did you enjoy making this beginner amigurumi bunny pattern? We'd love to see your finished creation! Share photos of your bunny on social media using #BeginnersAmigurumiBunny or #CrochetBunnyPattern.


