


Detailed Amigurumi Owl Pattern Instructions
Head-body (one piece)
With brown yarn:
R 1: 5 sc in mc (5)
R 2: (inc) * 5 (10)
R 3: (1 sc, inc) * 5 (15)
R 4: 1 sc, (inc, 2 sc) * 5, 1 sc (20)
R 5: (3 sc, inc) * 5 (25)
R 6: 2 sc, (inc, 4 sc) * 5, 2 sc (30)
R 7: (5 sc, inc) * 5 (35)
R 8-9: 35 sc (2 rows)
R 10: 3 sc, (inc, 6 sc) * 5, 3 sc (40)
R 11-13: 40 sc (3 rows)
R 14: (7 sc, inc) * 5 (45)
R 15-19: 45 sc (5 rows)
R 20: (7 sc, dec) * 5 (40)
R 21: 3 sc, (dec, 6 sc) * 5, 3 sc (35) R 22: (5 sc, dec) *5 (30)
R 23: 2 sc, (dec, 4 sc) * 5, 2 sc (25)
Stuff with fiberfill.
R 24: (3 sc, dec) * 5 (20)
R 25: (2 sc, dec) * 5 (15)
R 26: (1 sc, dec) * 5 (10)
R 27: (dec) * 3
Cut the yarn, leaving a long tail. Pull off the hole with needle. Hide the end of yarn inside the body.
Eyes (make 2)

With milk yarn:
R 1: 6 sc in mc (6)
R 2: (inc) * 6 (12)
R 3: (1 sc, inc) * 6 (18)
Make 1 sc, sl st and leave a long tail for sewing.
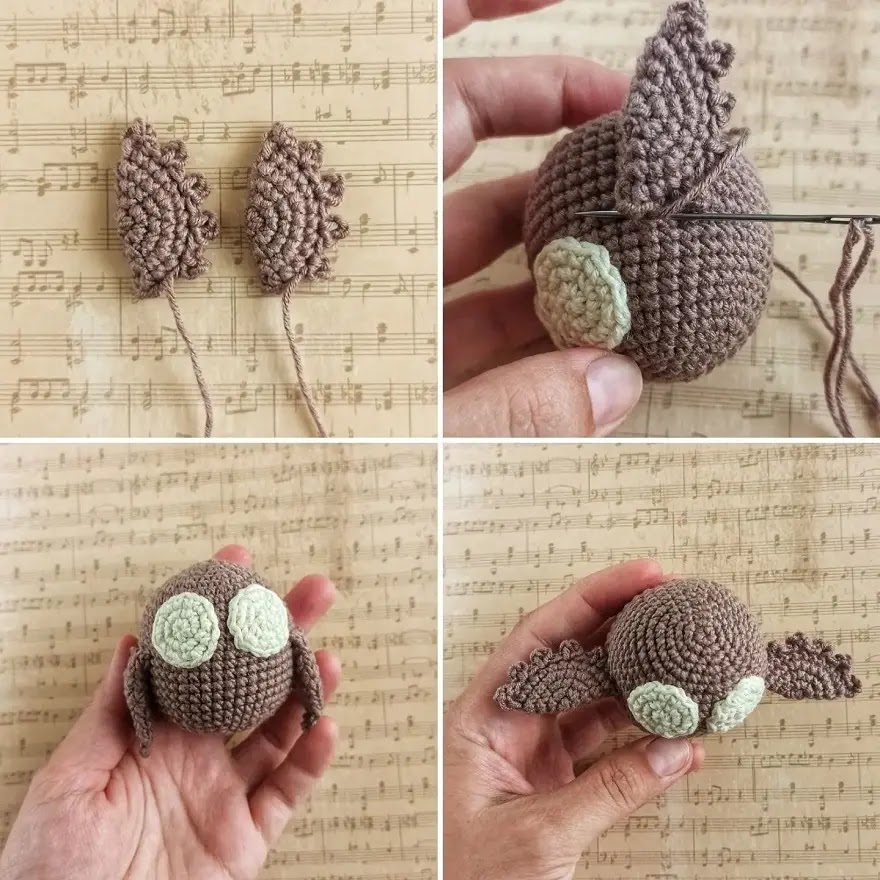
Wings (make 2)

With brown yarn:
R 1: 6 sc in mc (6)
R 2: (inc) * 6 (12)
R 3: (1 sc, inc) * 6 (18)
R 4: (2 sc, inc) * 6 (24)
Fold top of wing flat, 1 ch and 12 sc through both sides across. Turn the work and make 3 ch, in the 4th ch from hook: 1 sl st. Continue crocheting: ((1 sl st, 3 ch, 1 sl st), 1 sl st) * 4
There are three stitches left until the end of the row; we will use them to sew the wing to the body. F.o. and leave a long tail for sewing.
Ears (make 2)

With blue yarn: Embroider 3 chain stitches (view the Chain stitch embroidery tutorial) on the top of the head. Then crochet: (1 sl st, (4 ch, from the 2nd ch from hook: 3 sl st; 1 sl st)) * 3
F.o.
Feet (make 2)

With mustard yarn: Keep the body upside down, facing you. In R 22-23 we will crochet the feet. The pattern is the same like for the ears. Embroider 3 chain stitches on the top of the head. Then crochet: (1 sl st, (4 ch, from the 2nd ch from hook: 3 sl st; 1 sl st)) * 3
F.o.
Assembly and Finishing Touches

Sew the ears to the head. Embroider eyes with black yarn, a beak with mustard yarn. Sew the wings on the sides of the body. Use a blue yarn to embroider knots on the body with a French knot or ticks with a simple embroidery stitch.
Expert Tips for Perfecting Your Amigurumi Owl
When creating this amigurumi bird pattern, remember that tension is key. Maintaining consistent tension throughout will ensure your owl has a professional, polished appearance. The double crochet 2 technique can be used for texture variations if you'd like to customize your owl's appearance.
For those who enjoy making gifts with purpose, this owl pattern can be adapted for charity work. Many organizations welcome handmade amigurumi toys for children in hospitals or shelters. Check out opportunities for where to donate crocheted items near me or explore crochet volunteer opportunities in your community.
Share Your Amigurumi Creations!
We'd love to see your finished amigurumi owl! Join our crochet community to share photos of your work and get inspiration for your next project. Consider creating a collection of amigurumi birds including this charming owl, or explore other popular amigurumi themes like amigurumi Minecraft characters for the gaming enthusiasts in your life.
If you enjoyed this pattern, be sure to check out our other free crochet designs, including more advanced techniques like the cat crochet stitch and specialized patterns for charity crafting.


